Showing posts with label Recipes. Show all posts

Wednesday, July 20, 2011

I am a Dinner ROCKSTAR!

I ROCKED dinner tonight! I cannot remember the last time I made something so dang delicious! AND, the cherry on top, I got home from work, had dinner cooked, a well fed husband and the kitchen cleaned up by 6pm, leaving the rest of the night for relaxing (and writing this post). Boo-yah baby!


I followed the recipe above for the most part, but here is exactly what I did:

1/2 cup mayo
1 good squirt Spicy Brown Mustard
1/2 onion, finely chopped
1 package Perdue Short Cuts Carved Chicken Breast
3 strips of bacon, cooked & chopped
1 cup cheese, mix of cheddar & mozarella
2 tubes refrigerated crescent rolls
1 small tomato
half a head of iceberg lettuce, shredded
ranch dressing (on the side)


Mix onion, mayo & mustard


Cube up the package of Perdue Short Cuts & add chicken, bacon & cheese to mayo mixture


Lay crescents out like the photo on a pizza pan.


Get messy & place the filling around the inside of the crescent circle.


Bake @ 375 for about 20 minutes or until the crust looks like.....


THIS!


Yummy!!

This recipe would be great for a party. It makes about 8 portions. 


Serve with diced tomatoes, lettuce & ranch dressing.


For side dishes, I made roasted zucchini & carrots (tossed with olive oil, salt, pepper and red pepper flakes) and watermelon. The watermelon was served separately, of course. I highly recommend this recipe! (And please pardon my awkward spacing. Blogger and I are have a lovers quarrel tonight.)

Friday, July 8, 2011

Fix My Recipe!

Okay Housewives & Housewife Appreciators, I need help with a recipe!

I found this awesome looking photo on Pinterest, which was the answer to my grocery prayers because I happened to find myself the owner of a heaping bowl of jalapenos with to intended purpose this week.

Yummy Bacon Wrapped Jalapeno Poppers courtesy of DoughMesstic
I planned to run home last night and whip them up for the Hubs as a future Wife Points Wednesday post, but, as he is prone to do, my Husband spoiled the surprise by skipping man night and staying in. (I know, I know... how dare he?!?)

So, I decided it was the perfect opportunity for us to cook together, something we used to love doing but rarely find the time for anymore. (And this saved me from admitting that I had no dinner plan and would have probably just eaten some SunChips and a Skinny Cow ice cream sandwich for dinner had he not been home.)

After digging around in our tool drawer for about 10 minutes looking for my handy-dandy pepper seed scrapper-outer tool, "cooking together" turned into my husband preparing his own snacky surprise while I organized the kitchen drawers. This recipe didn't really require four hands, fortunately, and I stand by my side-tracked decision because look how bad they were:


No wonder I couldn't find anything! Now, look at how much better they are:


Okay, so what was I talking about? Oh yea, the jalapeno poppers. Here is what we did:


The Hubs grabbed the largest knife we own regardless of the fact that it was disproportionally large for the task at hand and cut the jalapenos in half.


Then he used the pepper inside scrapper-outer tool I eventually found to remove all the seeds & washed all the peppers.


Then we mixed up the cream cheese and seasonings (onion and garlic powder, salt & pepper) per the recipe.


Then we changed the recipe up a bit by cooking & chopping up the bacon to add to the filling rather than wrapping the peppers in individual bacon strips. My husband doesn't follow recipes very well; he is an artist in the kitchen. Or something like that.


Then we stuffed the peppers (I was helping by this point) and sprinkled some panko crumbs on top for good measure & baked them at 350 for 45 minutes.

Oops- forgot to take an after photo. Sorry kids! They did turn out beautifully though but tasted... well... not quite right. We couldn't put our fingers on what was wrong but it was as if something was missing. Maybe they weren't cheesy enough? Maybe they needed another seasoning? Or perhaps they were over seasoned? Is baked just no where near as good as fully breaded and fried within an inch of their little pepper lives?

I don't know- help! What do you think? Any suggestions on how we can improve this recipe or does anyone have a phenomenal jalapeno popper recipe they'd like to share? I feel like this is an essential recipe I should have in my arsenal so please help!

Tuesday, June 28, 2011

Dinner Tonight: Chile Rellenos Casserole

The Hubs loves chile rellenos. He orders it each & every time we eat at a Mexican restaurant. I tried to impress him by making this dish once when we were dating. It was pretty much a disaster... everything that could go wrong did, including a small kitchen fire.

I've felt for years that I should try it again but was really, really afraid so I was very excited when I found this recipe by Kami from Nobiggie.net at I Never Grow Up. Super easy- 6 ingredients, one bowl, one baking dish & a can opener. Done. And look how beautiful it turned out:


It was a husband pleaser and I could actually eat it to! I'm getting better at this cooking dinner business!

Monday, June 27, 2011

Adventures in Baking

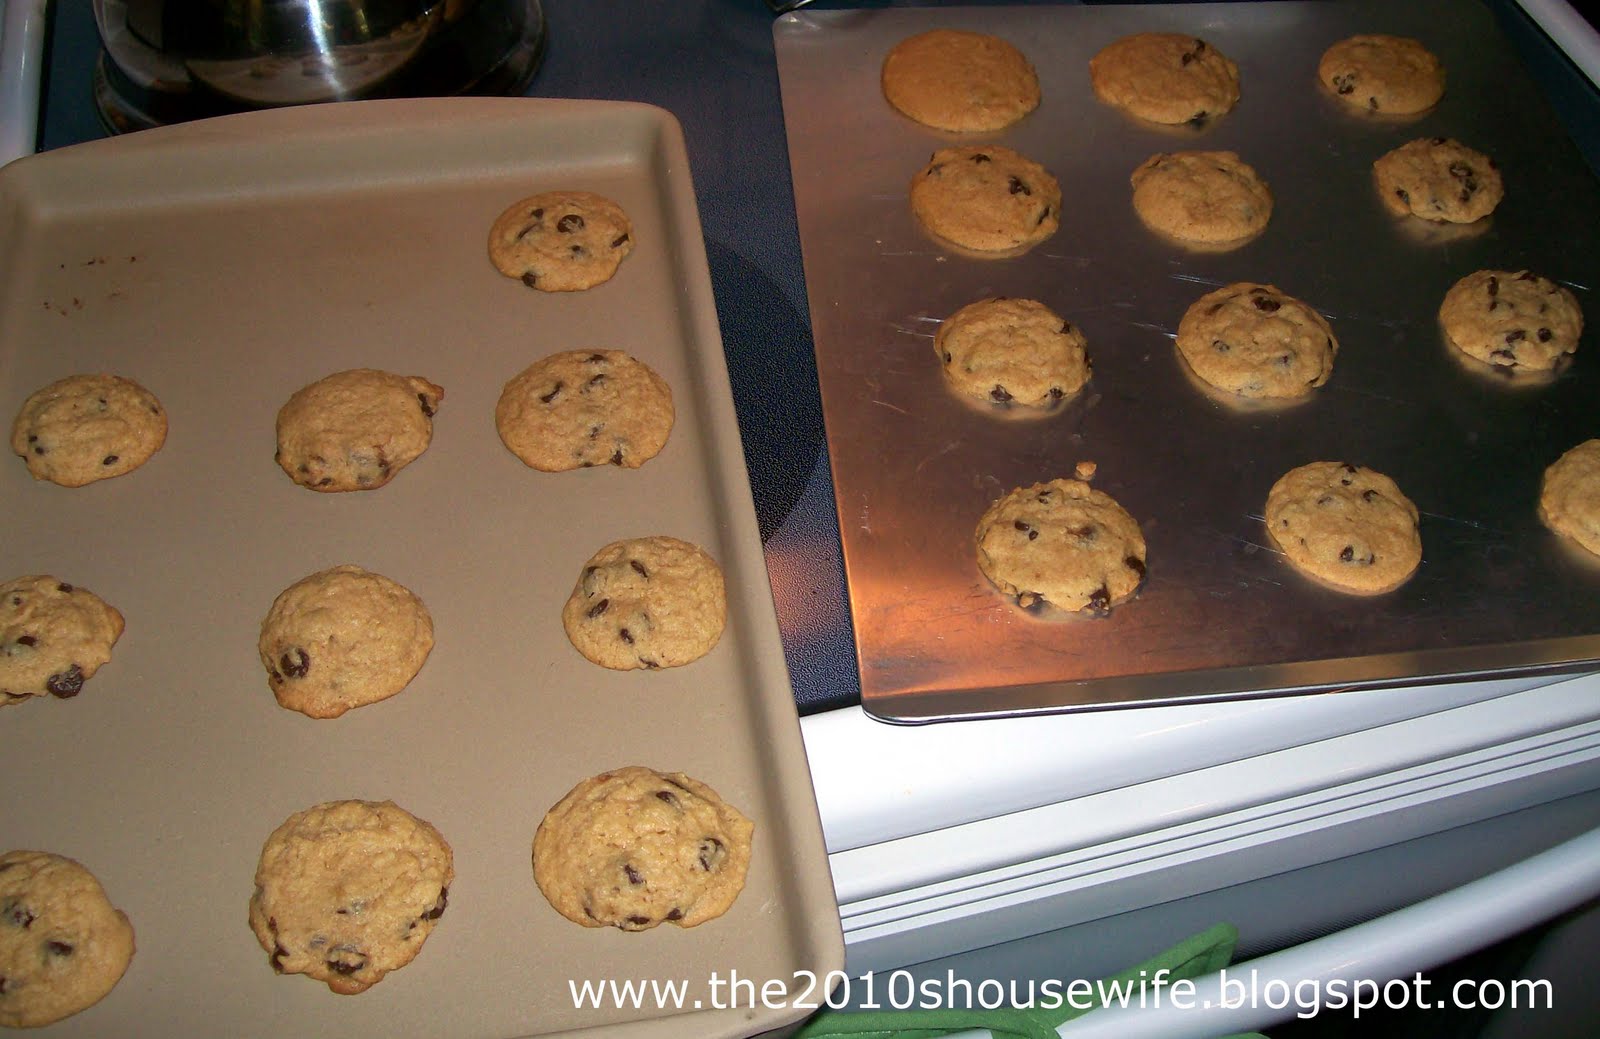
I did a little experiment the other night while baking chocolate chip cookies for a dinner party. I recently bought a Pampered Chef large stoneware bar pan. I planned to use it for savory baking/cooking but the hostess of the party said that it makes the best cookies so I wanted to give that a try.

I have always used Airbake cookie sheets and love how easy they are and how great cookies bake on them. So, I baked half the batch on my usual Airbake sheet and half on my Pampered Chef stone.


It was a tough call and my husband and I really didn't want to participate but since no one else was around I guess we had to be the judges.

There really isn't a right answer to this test but we did both prefer the stone-baked cookies. The Airbake sheet made a softer, chewier cookie. The stone-baked cookie was crispy on the bottom and chewy in the center, just how we like it.

There was enough dough for about 6 more cookies so I decided to bake those in a muffin pan.


I was thinking that the muffin pan would make them all impressively perfect round cookies, which it did but it also made them small and fatter- like a one bite cookie. They weren't really big enough for me but I have a recipe for peanut butter & jelly cookies that I think would look great baked in this pan.

I may have to give this test a re-do soon just to be sure the results were accurate! ;)

Thursday, June 23, 2011

Oatmeal Coconut Walnut Cake

My family has found a new go-to cake!

I couple months ago I found this recipe from The Mother Huddle. My dad's three favorite things are oatmeal cookies, coconut (fresh or in a cream pie) and walnuts (eaten raw or baked into anything). So what could be more perfect for Father's Day dinner than an Old Fashioned Oatmeal Cake with Coconut-Walnut Frosting?!?


I gotta tell you- I enjoyed every step of baking this cake. It was easy to make- the only ingredient I didn't have on hand was evaporated milk. It smelled FAN-FREAKIN'-TASTIC while baking! And everyone LOVED it! I knew my dad would, but I had no idea how much everyone else in the house would enjoy it. I think my husband had three pieces that night!

There have been several requests to bake this again. I think I'll need to add a few cans of evaporated milk to the stockpile list so I am ready to go whenever we get a craving for this incredible cake!

Here is the basic recipe but please do stop by The Mother Huddle to check out her baking tips!


Old Fashioned Oatmeal Cake

1-1/2 cups boiling water
1 cup oatmeal (old fashioned or quick)
1/2 cup butter (1 stick)
2 eggs, beaten
1 cup brown sugar
1 cup white sugar
1 tsp soda
1 tsp cinnamon
1/2 tsp nutmeg
1 tsp vanilla
1-1/3 cup flour

Pour boiling water over oatmeal and add the butter. Let stand until butter is melted.
Add all other ingredients. Mix together well. Pour into a greased and floured 9×13 pan. Bake at 350° for 30-35 minutes.

Coconut Walnut Frosting

1/2 cup butter (1 stick)
1/2 cup white sugar
1/4 cup evaporated milk or cream
1-2 cups shredded coconut (I only used one cup but my mom uses two)
1 cup chopped walnuts (may substitute pecans if desired)
1 tsp vanilla

Melt butter in quart size pan and add sugar, evaporated milk (or cream.) Bring to a boil and cook until thickens, about 4 minutes on my stove. Remove from heat and stir in coconut, nuts, and vanilla. Pour over cake and broil in oven until toasty looking. 


Tuesday, June 21, 2011

The Best Dinner I Couldn't Eat

I have been collecting new recipes to try out during Housewife Week for months. I picked the one I thought my husband would like the best for Monday's dinner: Jalapeno Popper Burgers from Lady Behind the Curtain.

I was so excited to make this recipe, but needed to find a way to easy it up a bit. Just because I had hours available Monday to prepare dinner doesn't mean I always do so if there was going to be a chance of me making these burgers again I needed to cut back on some of the prep.

Here is my altered ingredient list:

Jalapeno Popper Burger Recipe
Ingredients
3 jalapeno peppers  Substitute: Chopped jalapenos in a jar
1 teaspoon olive oil
6 bacon strips, cooked and crumbled
1 package (3 ounces) cream cheese, softened
2 garlic cloves, minced  Substitute: jarred minced garlic
1 teaspoon salt
1 teaspoon lemon-pepper seasoning Substitute: Cayenne Pepper (this might have been a mistake)
1/2 teaspoon pepper
1/4 teaspoon paprika
2 pounds ground beef
6 slices pepper Jack cheese
6 hamburger buns
lettuce
tomato
3/4 cup guacamole

A few of my substitutions were geared towards my husband's tastes but unfortunately they made the burgers a little hot for me. So hot, in fact, that I wasn't able to actually eat my burger. :( Instead, I sort of nibbled around the outside and then gave my husband the inner circle containing all the spicy jalapeno chunks. 

The Hubs did, however, love his burger! He actually called it "The Best Burger Ever." I'm beaming with pride!


Sunday, June 19, 2011

Baking for the Man

I had on my Housewife Week To-Do List to get 3 quotes for refinishing our basement. We were planning to start refinishing it this Winter so I wanted to start interviewing contractors and getting quotes now. That is, until this happened:


Yep, that's my front porch. Nope, it wasn't a tornado. The cause is simple: My husband + his friend x beer = a missing from porch.

To be fair, it was all my fault. I complained enough about the old outdoor carpet on the porch that my husband removed it. What was lying underneath wasn't quite so pretty. (I believe my argument about the carpet went something like "Whatever is underneath can't be worse than this awful carpet!" Insert foot into mouth.)

So, the basement planning is on hold for now and we are full speed ahead on a new & improved deck. It will be about 2 1/2 times the size of the old one and take a look at our future view:


Yep, that's a vineyard and coming very soon to the left of the photo will be a new winery. Jealous??

So, what does this have to do with baking? Well, as you deduced from the equation above, the Hubs and his friend spent hours on Saturday in the crazy heat demolishing the porch. I did what housewives do and made them lunch and cookies. But no, I didn't make just any ordinary cookie. I dare someone to find a better cookie recipe for two hungry, sweaty men!


So what was so special about these cookies? Well, I'll tell you.... a secret ingredient!


BACON!!!!!

I found a recipe online for Chocolate Chip Bacon Cookies and wasn't quite so sure about it, but knowing how much my husband loves bacon I thought I'd give it a shot. I can't believe I'm about to saw this but they were pretty awesome! They taste sort of like when your bacon gets dipped into your pancake syrup... but with chocolate.

I promise these won't disappoint but I would suggest you make them when there will be multiple guys around to help you finish them off. The recipe I used from Mouth from the South makes quite a lot of cookies!

What do you think readers- do Chocolate Chip Bacon Cookies sound yummy or just too weird to try?


Thursday, June 16, 2011

Enchilada Cups

I wanted to make chicken enchiladas the other night but we didn't have any enchilada sauce and I didn't want to make a mess. I have a tendency to make a big ole mess when attempting to wrap up enchiladas or burritos and I hate having to soak and scrub my casserole dish after eating them all up. So, I decided to make enchilada cups.

Filling:

2 large chicken breasts, cubed
1 Philadelphia cooking cream, Sante Fe
1 large green pepper, chopped
1 large red pepper, chopped
1 large onion, chopped

Cook the filling until chicken is thoroughly cooked.

Place one small flour tortilla in each section of a bar/muffin pan (sprayed with cooking spray).


Spoon in filling.


Cover each cup with half a slice of pepperjack cheese.

Bake @ 350 degrees until cheese gets melty.


We loved these! Clean up was super easy and they packed up nicely for lunches throughout the week. If you give this recipe a try, be sure to come back and let me know what you think!

Saturday, June 4, 2011

Fruit Salsa


Fruit salsa is the perfect summer party food! I request it at any party thrown in my honor (birthday party, bridal shower) and I've made it myself for many parties (and as a birthday gift once too).

There are two ways to make it: one super easy and one a little more time consuming.

First, buy whatever fruit you like or whatever looks good or is on sale at the store. The salsa in the photo has pineapple and blueberries, both were BOGO this week, plus red grapes, kiwi and one large granny smith apple (to add a little tartness). Strawberries are also great and peaches add a surprising flavor that really stands out.

The quick and easy way: Wash and de-stem all the fruit then chop everything into large chunks. Put it all in a bowl and go to town on it with a biscuit cutter or a Pampered Chef crinkle cutter. (Or really, whatever works!) This is going to make a juicier salsa, more like a jarred salsa. It's really hard to get the grapes chopped this way because they slide out from under the blade, so you may want to hand cut them into halves so they are easier to eat.

The way I like to make it is to chop all the fruit into teeny, tiny little salsa-sized pieces. Crazy? I know, but it makes it much more like a fresh salsa consistency, which I prefer. I find that this method freezes better too which is great for me since I usually make way more than I need.

It has been so hot here lately and I must be dehydrated because I'm craving fruit. I made a huge bowl of fruit salsa this week and have been eating a bowl for lunch everyday with a spoon. 

A great compliment to a good fruit salsa is cinnamon sugar tortilla chips. I don't have photos of these because I didn't make them this time but they are sooo easy and so good! Take any size flour tortillas and cut them with kitchen scissors into whatever shape you want. I usually make a triangle shape, like a standard tortilla chip but I've also made strips too. In a small bowl mix up a little bit of cinnamon and some sugar. I can't give you quantities because I never measure and it really depends on how many chips you are making. Just mix until it looks good to you.

Place your chips on a baking sheet and sprinkle the sugar mixture over them. Bake at 350 degrees until.. um.. they look right? I know, I'm the worst recipe writer ever. I would guess its about 10-15 minutes. Maybe less? I usually poke them until they feel crispy and then take them out.

If you like the little bowl shaped tortilla chips you could cut circles out of your tortilla and push them down into a mini muffin pan to bake.

Are you hungry yet??

Friday, May 27, 2011

Easy Southwestern Stuffed Peppers

Before I met my husband my standard order at a restaurant sounded a little like this: "I'll take that, except no tomatoes, onions, peppers, mushrooms, olives or anything spicy. And please no blue cheese or feta on the salad. And I'll take any condiments and sauces on the side. Thanks! Oh, and is the cheesecake made with cream cheese? If so, no thank you."

Fortunately for me (and all servers that get the pleasure of waiting on me now) I have expanded my horizons a bit over the last couple years. I am way less picky and now love a lot of foods I didn't use to like. One dish my husband turned me on to is stuffed peppers. Man was I missing out!

My mother-in-law has a family favorite recipe for a cheeseburger stuffed pepper which is phenomenal. Lately, we've been trying different variations on the recipe. Tonight I decided to try to make a quick & easy stuffed pepper with all the flavors we love- Southwestern Style!

Take 6 whole green peppers, wash, cut off the tops and throw out all the guts. Put in a casserole dish.


Cook 2 cups of brown rice (I used Uncle Ben's minute rice, nothing fancy.) *That's two cups uncooked, so four cups cooked.


In a large bowl mix the rice with one pound of ground beef, half a cup of shredded Mexican cheese, half a can of diced tomatoes w/ green chilies (not drained) and one cup of fresh salsa. The original recipe calls for chopped onions. I didn't want to take the time to chop onions, nor did I want to deal with the watery eye business. My grocery store has the best fresh salsa in the produce section and it was on sale this week so I thought I'd save some time and energy and give that a try. If I had thought of it ahead of time, I would have added a cup of black beans (drained) and a cup of corn... but sadly, I didn't.

Salt & Pepper.


I used a large ice cream scoop to mix everything up (so I didn't have to take off my rings) and the scoop made it really easy to stuff the peppers. I divided up the remaining diced tomatoes and put those on top in lieu of the traditional tomato or spaghetti sauce. Then I added some sliced pepperjack cheese on top to make it all melty and pretty and spicy.


Bake 1 hour at 350 degree. Yumm! Easy peasy! Open a few cans, cook some rice in the microwave- one bowl and one pot cooking!

Linking @ Make Ahead Meals for Busy Moms

Wednesday, May 18, 2011

Monster Empanadas

A couple years ago my husband and I took a Mexican cooking class together. One of our favorite recipes was for pork empanadas. The original recipe they provided us was a little complex so we found ways to cut it down to our style of cooking: cheap and fast.

The first alteration was to eliminate the hand rolled dough and bring in the pre-made pie crust. Such a time saver! Though, we've had trouble getting the size of the dough circle and proportion of filling just right. Small circles resulted in torn dough & not enough filling. Medium sized circles resulted in not enough filling. Large circles resulted in too much dough. No matter what sized dough circles we use we always have a ton of leftover filling. It's been a frustrating trial and error process. That is, until tonight!

When we typically make empanadas we fold the dough circle in half, but this time we left them whole in attempt to make a heartier empanadas. Here are the ones we made Friday night:


As per usual, we had over half the filling left over. We've used the leftover filling to make tacos in the past but this time I was bound and determined to find a better way to make an empanada and that's when it came to me. Two words: Monster Empanada!

First, here's the recipe for the filling:

1 pound ground pork (or sausage or chicken or ground beef, whatever you want)
1 green pepper, diced
1 medium onion, diced
1 clove garlic, diced
salt & pepper to taste
whatever seasonings you want, we used cilantro and typically add Cayenne Pepper when we want it spicy

Other suggestions for filling:
green chilies
banana peppers
hard boiled egg
capers
raisins
olives
fresh oregano or parsley
hot sauce

Brown meat & onions in a frying pan. When thoroughly cooked add remaining ingredients and cook over low heat for 10 minutes.

The problem with using ready-made pie crust is that it doesn't re-roll very well. When you use a biscuit or cookie cutter to make the circle shapes there is a lot of leftover dough around the edges. You can try to knead the dough together and re-roll it, but it just doesn't work. I hate throwing out all that dough, so this time I decided to use it all!


I rolled out each of the two pie crusts and put half the filling inside. Brush water all around the edges (to help them stick together) and then close the empanada and pinch the edges shut with a fork. 

Beat an egg in a bowl and brush an egg wash over the top of the crusts. This will give the baked empanadas a golden brown & flaky crust. Like this:


Bake at 375 degrees for... um... until they look like the photo. (I forgot to pay attention to the time.)

Come back and leave me a comment if you try this recipe out yourself. I'd love to hear different variations on the filling!

Linked up @ Miz Helens Country Cottage

Wednesday, May 11, 2011

Gettin' My Cook On: Chicken Corn Chili

Okay, Okay... I know this isn't a very summery recipe but I can explain. My parents are house hunting and my husband and I get to go with them and their Realtor tonight after work to view a few prospects. We have a very short window of time for dinner so I offered to cook for everyone. I needed something quick, easy and would feed all 4 of us (with leftovers preferably). This sounds like a job for the Slow Cooker! <doo do do dooo> (Truth be told, I bought all the ingredients to make this recipe when it was cold out so I had everything on hand.)

This is probably a mixture of all Chicken Chili recipes out there. I like it because it's the first real meal I made that didn't start with a recipe and turned out awesome! I picked up a packet of McCormick's White Chicken Chili one day at the store and read the ingredients but it seemed a little plain. It didn't call for much so I decided to add in a few more ingredients that I like. Here's what I came up with:


1  McCormick's White Chicken Chili packet
1 1/2 lb Chicken Breast
1 can Great Northern beans (undrained)
1 can black beans (drained)
1 can whole corn (undrained)
1 can diced tomatoes with zesty mild green chilies (undrained)
1 can diced tomatoes with green onions & peppers (undrained)
1 tsp minced garlic
1 cup water

All cans are 14.5 ounces.

As you can tell from the photo above, I don't know the difference between Great Northern beans and butter beans. I remember wavering in the grocery aisle but can't remember why this time I opted for the butter beans. (FYI- Beans in can are larger than they appear on the label!) I guess we'll find out at 5 o'clock if the bean variety makes a difference. I also apparently decided I needed A LOT of butter beans. I think the ratio of meat to beans to other ingredients is entirely up to you- I doubt it will make much of a difference.

So, I put everything into the slow cooker, except the chicken, last night. I put the chicken in this morning before work. I'm hoping that the chicken will fall apart perfectly like pulled pork does... guess I'll know soon enough. If I have to I can take the chicken breast out and cube it... but I'd really rather not!


I like to mix a little shredded cheese in the bowl and top with some sour cream.

I promise to report back if it's awful and totally uneatable but it was very, very good the first time I made it. Wish me chili luck!